Thursday, October 23, 2008

Nearly There

I promise there will be pictures to come. The dress is virtually finished; I just haven't had the time to post due to Halloween party preparations. Where did all the time go? I swear this party sneaked up on me much faster than in past years. Anyway...

To do:
Attach veil
Attach hooks and eyes (skirt to bodice)
Turn up sleeves

The embellishing turned out to be much less painful than I thought it would be, harmless really. Like quilting and knitting (intimidating at first) beading the trim at the neckline was actually soothing and relaxing. Thanks to The Bead Shop for their help in purchasing the right tools. Without them it would have been very frustrating. I found the inspiration for the beading pattern from two images, one contemporary (Queen Catharine Parr) and one modern interpretation (Ann Boleyn, The Tudors).


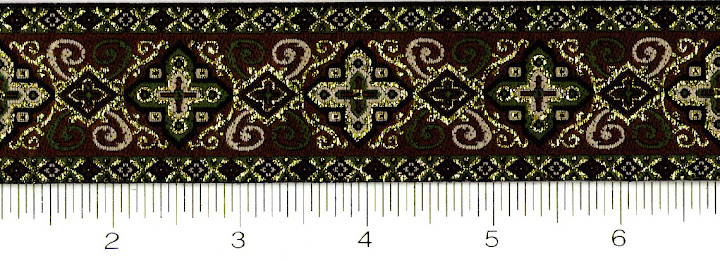
I placed one 10mm white pearl above and below each large cross in the boarder and one 3mm Aurora Borealis Olivine Swarovski crystal in the center. I have also placed one 3mm white pearl in the center of each smaller cross.

Monday, October 13, 2008

Checklist

Order fabrics
Make stays

Replace forepart
Make overskirt

Cut out pieces including train

Put together

Hem
Order pearls and other embellishments
Order trim
Buy supplies

Make bodice

Cut out bodice

Fit bodice (twice)

Cut out sleeves

Attach sleeves
Turn up sleeves
Add piping
Figure out back closure
Embellish

Make French Hood
Attach wiring to buckram

Cover with velvet
Embellish
Add veil

Order earrings

Order necklace

Minor Adjustments

In order to achieve the turned up sleeves of the Tudor era I had to make a few adjustments to my pattern.... okay, a few is an understatement. First I had to chop the closed Elizabethan sleeve (including seam allowance) at the elbow. From the elbow up is constructed out of the velvet so as to match the rest of the bodice. From the elbow down (my undersleeves) is constructed of the same gorgeous fabric as my forepart.

Now comes the tricky part. At the elbow seem I have to insert the dramtic part of the sleeve that will be "turned up." In order to make these I have followed the directions I found online while drooling over other people's garb. I had to adjust the shape since I didn't want to have square sleeves. So all in all my sleeves come in three parts. This will be tricky to attach, but I am pretty sure that's only because I have no real training when it comes to costume construction. As you can see, the sleeve extendes well past my finger tips. This will ensure you see the beautiful lining fabric once I turn the sleeve up and also will expose the undersleeve.

Progress - In the French Style

No gown is finished without the proper head wear. It completes the look if you will. Ann Boleyn was known for being fashion forward and bringing French styles of dress to the English court. One way she did this was through her head covering, appropriately named a French hood.


Thanks to elizabethancostume.net, what otherwise would have been a daunting task is turning out to not be so bad after all. I followed their directions with a few substitutions and it's coming along quite well. Alas, I could not locate any millinery wire so heavy duty floral wire had to do. But it seems to be working out. I was lucky, their pattern for a 1533 French hood fit me perfectly so I did not have to make any alterations in that respect. I did however make thinks a bit easier on myself. Instead of covering both sides of the buckram crescent (3 layers) I covered only the front. No one sees the backside anyway. As you can see from the first photograph I cut the velvet a bit larger than the pattern so I could fold it over the edges.

Then comes the fun part: embellishments! I found beautiful gold trim at JoAnne's that resembles the gold metal trims found in portraits of the Tudor era. I have also used 10mm Czech glass pearls purchased from shipwreckbeads.com and several buttons I turned into ouches. Eventually I will be adding 3mm Czech glass pearls between the ouches and larger pearls but I won't be able to do that until I get some special thread and needles....

Once I get all the embellishing done I'll add the black fabric "hood" part.

Monday, October 6, 2008


In order to assure the proper fit of the gown more is needed than just the pattern. I make a mock up bodice first out of muslin. That way if i make any huge mistakes or need to adjust the pattern (like always do) then I can mess up all over the muslin and not ruin my velvet. Adjustments are made the the seems as needed and excess fabric trimmed away making sure to keep seem allowances. Nothing suck so much as trimming off too much and ending up with a garment way too tiny.


Once the muslin mock up is to your liking, making sure it is close fitting you can take apart the seems and use it as your pattern to cut out your fashion fabric, in my case velvet.

It occurred to me today that I should probably tell you what pattern I am using since it alway bothered me when, while reading other dress diaries, I would really love a gown and want to make one of my own only to discover that the author had not disclosed the pattern. So in an attempt to be forthcoming (in case anyone likes the gown and wants to make one of their own) I am using Margo Anderson's Elizabethan Lady's Wardrobe pattern with a few alterations in order to get Tudor sleeves.